Showing posts with label Baking. Show all posts

4.29.2012

Tangelo-Blueberry Scones: Happy First Anniversary William and Kate!

Where were you April 29th, 2011 in the wee hours of the morning? If you were like me, you had set your alarm for 4 o'clock in the morning so as not to miss any of the Royal Wedding festivities and were enjoying your homemade scones, especially prepared for the occasion.
Source: Hello Magazine
There is something about royalty that is fascinating. All of the tradition, history and grandeur. Perhaps is was the fairytales as a child? My mother's generation had Princess Grace and Prince Rainier and now we have Duchess Kate and Prince William.
Source: TIME
And what a couple they are. They have a genuine and beautiful romance and who doesn't love that a common girl can become a future queen? But most of all, they've got class- something lacking from most celebrities in the media.
Source: The Telegraph
So in honor of the first anniversary of the royal couple, I have baked delicious Tangelo-Blueberry Scones to enjoy while my tush is glued to the couch watching all of the celebratory programing on BBC America. Here's to you, William and Kate!

I love scones. I'm not a big sweets person so this is the perfect treat for me. They're buttery, slightly sweet and have a nice crumble when you bite into them. They make a great breakfast treat or a snack with your afternoon coffee. And the ingredients are so simple. I always love a blueberry scone and thought that the sweet and zesty flavor of the tangelo would compliment it nicely. Do you ever eat tangelos? They're a cross between a tangerine and a grapefruit and they're my favorite.
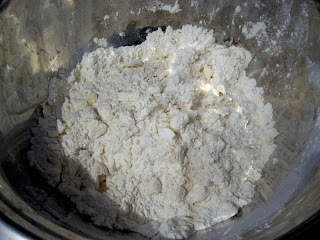
To start, you stir up all the dry ingredients for the recipe and rub in two sticks of cubed butter (yes, that's why they're so good!) until a coarse crumb forms. 
My crumb was really not fine enough, it needs to be finer than when you are making a pie crust. I think it helps the dough come together better, since there isn't much liquid.

Next, you stir in the buttermilk and the flavorful fruity additions. I didn't have buttermilk, so I made my own, a little trick I picked up from this post from Yes, I Want Cake (great blog!). Simply put 1 T vinegar into a measuring cup and fill it with milk up to the 1C line. Let site for 5 minutes and you've got buttermilk! Great money-saving tip!


 Now you separate the dough into two discs and cut out the scones! Then they get brushed with a beaten egg and get sprinkled with sanding sugar. I used this big, coarse sugar because I like the crunch it gives them.

As quickly as you got them into the oven they are ready to eat. They're best served warm with a nice cup of tea!

So let's all raise a cup of tea to the Royal Couple! Congrats!

Tangelo-Blueberry Scones
Adapted from Bon Appetit Clementine Scones
  • 3 1/2 C flour
  • 1/2 C sugar
  • 3 3/4 tsp baking powder
  • 3/4 tsp salt
  • 1/2 tsp baking soda
  • 1 C chilled, unsalted butter, cut into 1/2" cubes
  • 3/4 C buttermilk (or pour 1 tbs vinegar into measuring cup, fill up to 1 C with milk, let stand 5 min to make your own, then use amount needed)
  • 2 tbs tangelo zest (5-6 tangelos)
  • 1 C blueberries
  • 1 large egg, beaten for wash
  • Coarse sanding sugar

  1. Preheat oven to 375 degrees. Mix dry ingredients in mixing bowl. Rub the butter into the dry ingredients using your fingers until a coarse crumb forms. 
  2. Mix zest into buttermilk. Add buttermilk and blueberries to bowl. Toss until moistened.
  3. Form dough into ball and separate into two halves. Form each half into a 3/4" thick round and cut into 8 (or 6) wedges. 
  4. Brush each wedge with the egg wash and sprinkle with sugar.
  5. Bake for 15 min until tester comes out clean. 


Linked Up @
Momnivore's Dilemma
Serenity Now
Simple Living with Diane Balch
The Country Cook
The Grant Life
Rattlebridge Farm
Me and My Sweets
Nifty Thrifty Things
Under the Table and Dreaming
Addicted to Recipes
Everyday Mom's Meals
Making the World Cuter
Ms. enPlace
Sumo's Sweet Stuff
Flamingo Toes
A Pinch of Joy
Randee's Organized Chaos
Don't Mess With My Tutus
Serendipity and Spice

3.16.2011

Foreign Food: Coconut Macaroons with Chocolate and Lime

I've decided to start a new column: Foreign Food. For this column, I will be cooking a type of food that is new to me or incorporating an ingredient or technique I have never used before. Join me on my journey to gastronomic enlightenment!

For my first foreign food: the coconut macaroon. Crisp on the outside, soft and tender on the inside. The perfect little cookie. I've added lime to the batter and drizzled the top with chocolate for good measure. Unlike your typical cookie, the macaroon has no baking soda or baking powder. Instead, this cookie is leavened by egg whites.
This treat is pretty easy to make- place all of your ingredients in the pan, turn on the heat and start stirring. All while singing "you put the lime in the coconut, drink them both up...". When the mixture is thickened, it gets spooned on to a cookie sheet and goes straight into the oven.
 After about 15 minutes, the macaroons should look golden, brown, and delicious!
While the cookies are cooling, you can melt some milk chocolate and toast some almonds to sprinkle on top.
The sweetness of the lime and the coconut are balanced perfectly by the richness of the chocolate and almonds. And there's fruit in it, so you don't have to feel guilty, right? For being such a delicate treat these macaroons are so easy to make!

Macaroons are a pretty flexible cookie. Don't like lime? Try orange instead. Maybe throw some almond extract in to the cookie base. And don't forget all of the drizzles and toppings you could try! Various nuts, chocolates and glazes... the possibilities are endless.

Do you know of a food you think I need to try? Leave a comment!

Coconut Macaroons with Chocolate and Lime
4 egg whites
3 c sweetened shredded coconut
3/4 c sugar
2 tsp vanilla
1/4 c flour
1 tsp lime zest
2 tsp lime juice
1 c milk chocolate chips
1/2 c almonds, chopped

1. Place egg whites, coconut, sugar, vanilla, flour and zest in heavy-bottomed sauce pan.
2. Place pan over low heat and cook 6-8 minutes, stirring constantly. Remove from heat when thickened.
3. Stir in lime juice.
4. Place spoonfuls of mixture onto parchment-lined baking sheets and bake @ 350 for 12-15 min, or until golden brown. Let cookies cool on baking sheet.
5. Melt chocolate in microwave according to package or in double boiler.
6. Chop almonds and place in dry saute pan. Toss almonds in pan over medium-high heat until fragrant.
7. Drizzle chocolate over macaroons and top with almonds.

2.23.2011

G-Love Cake: Just What the Doctor Ordered

Last week, on my day on call, things were not looking so great. As the call team, we are required to finish all of the cases scheduled for the day. At mid morning, it looked like we had one doctor with two day's worth of patients. I was pretty sure we were never leaving the hospital.

And then Dr. G came to the rescue (on his vacation day!) and saved our lives. I even got to leave before the sun went down!

So I give you: The G-Love Cake. Created especially for the Knight in Shining Armour of the Cath Lab. Chocolate cake with raspberry filling and a mocha Swiss meringue buttercream. To die for!

Mmmm... chocolate cake! You really can't go wrong with chocolate. This cake is made with bittersweet chocolate melted down with fresh brewed coffee to bring out the chocolate's flavor. I also added sour cream to keep the cake moist and light.

Like any baked treat, you start by creaming together the butter and sugar and slowly add in the eggs (one at-the-time as Paula Dean would say). Next, the yummy melted chocolate and coffee mixture gets poured into the batter along with some vanilla and... yummm...

Now comes the cake flour mixture and sour cream. Yes, you must use cake flour! It makes your cake much more tender. And I know you want a tender cake. Don't worry, they sell it at Walmart!

Now, pour this delicious mixture into three greased and floured nine inch round pans. Trust me- grease and flour them well. Yes, even if your pan is "non-stick". You will thank me.
Pop those babies in the oven and go find something to do, like make frosting. Don't peek! They should be done in about half and hour.

After your cake tester, aka toothpick, comes out clean leave the pans to cool before flipping the cakes out. Don't do what I did and try to rush the cake to make a dental appointment. Because instead of this:
You'll have this:
Oops. Patience is not a strong suite of mine. Two layer cake it is!

While you're letting those three... or two... cakes cool lets make the delicious caffeinated frosting.

Mocha Swiss meringue buttercream. Sounds kinda complicated. Don't be afraid! It's really pretty simple and so worth it!
First, you start by making the meringue half of the equation.

Egg whites and sugar are heated over a double boiler (fancy for heat-proof bowl stuck over pot of simmering water) until the sugar is dissolved. It should feel smooth between your fingers.

For those of you with a stand mixer this next part will be a cinch. I hope to some day to join your ranks. For now I will beat this mixture for 10 minutes with my ancient hand mixer until stiff peaks form and the mixture is glossy and beautiful.
See how the meringue stands up on its own? That's what you want!

Now you get to add an entire pound of butter, tablespoon by tablespoon, into the meringue, mixing well. Don't freak out if this happens:
It may look like the mixture has curdled, but keep mixing and it will smooth back out.

Add in melted semisweet chocolate, espresso powder and vanilla and... voila! You have a fabulous frosting! This step is where you can use some creative license and flavor the frosting to your needs or tastes. The base has a great texture for frosting or piping and is not overly sweet- perfection!

Now you can put your cake together.
Smother the cake layer with 1/4 inch seedless raspberry jam and top with the second cake. Repeat if you didn't destroy your third layer.

Then smother it with frosting and decorate with fresh raspberries. And don't forget to lick your spatula!
I bought this to work and it it was 80% gone by 9am. Need I say more?

G-Love Cake
6oz bittersweet chocolate
3/4 c brewed coffee, strong
1 c butter, unsalted, softened
2 c sugar
4 eggs, large
2 tsp vanilla
2 1/2 c cake flour
2 tsp baking soda
1/8 tsp salt
1 1/2 c sour cream

1. Combine coffee and chocolate in saucepan over super low heat and cook until melted.
2. Beat butter on medium until creamy and gradually add in sugar.
3. Add in eggs one at a time, mixing after each addition.
4. Add chocolate mixture and vanilla and beat 1 min.
5. Mix together dry ingredients. Add alternately with sour cream to butter mixture, beginning and ending with flour. Mix on low until blended. Be sure to scrape down the sides of the bowl as you mix.
6. Pour batter into three 9" greased and floured pans. Bake @ 350 for 25-30 min until cake tester comes out clean.
7. Let cool then turn out onto wire rack to finish cooling.

Mocha Swiss Meringue Buttercream
5 egg whites, large
1 c + 2  tbs sugar
Pinch of salt
1 lb butter, unsalted, softened and cut into tbs
1 1/2 tsp vanilla
4 1/2 oz semisweet chocolate, melted
1 tbs instant espresso powder (not instant coffee!)

1. Whisk eggs, sugar, and salt in double boiler until mixture is warmed and sugar dissolves.
2. Pour mixture into mixing bowl and beat until stiff peaks form and this mixture is cooled. Approx. 10 min.
3. With mixer on medium, add butter 2-3 tbs at a time, mixing well after each addition.
4. Add vanilla, chocolate, and espresso powder and beat on medium until smooth

2.03.2011

Banana Bread Showdown

My house is very, very cold right now. So, as the snow day progressed I decided I would need to do something to keep me from freezing to death. 

Slaving away over a hot stove was just the ticket.

It just so happened that I had all the ingredients I needed to make banana bread. I've been saving some very ...um... *ripe* bananas in the freezer and they were starting to look a little freaky. I have never frozen bananas before- it is not a pretty sight!

I feel like banana bread is one of those items that you prefer the way your mother made it. Well, I have no memory of my mother ever making banana bread so I was going to have to look elsewhere for a recipe.

Skimming through rows and rows of cookbooks, I landed on a recipe from a church cookbook. Surely the contributing woman was someone's mother so it should be great! Since I'm new to making banana bread, I thought I might as well try out an alternative recipe so I looked to a classic- Joy of Cooking.

This leads me to the main event...
Irma vs Myrtle: A Banana Bread Showdown

Who will come out on top? Myrtle the parishioner who uses butter and a splash of milk? Or Irma Rombauer who opts for silky shortening?

The ingredients for each recipe were very similar otherwise: flour , sugar, a fat, a leavening agent,  eggs, and nuts. I whipped up a batch of each and sent them to battle.

On my left, we have Myrtle...
And to my right, Irma...
And now judgment time!
While both loaves were pretty tasty, I'm going to have to go with Irma's recipe from Joy of Cooking as my winner. It was light and moist in comparison to Myrtle's. Sorry, Myrtle, better luck next time!

I do have to admit I may have toasted them up a bit too much. Both loaves lacked that moist, stick-to-your-finger goodness that I see when other people have made banana bread. Next time, I don't think that I will wait until the hour cook time is up to check their doneness!

Sounds like banana bread and I have some unfinished business. I will refrain from posting a recipe until I reach loaf perfection.

Do YOU have a delicious banana bread recipe you would like to share? Leave a comment!


2.01.2011

Homemade Dog Biscuits

Yes, you heard me right. No, I am not crazy.

Last year, I brought home some bacon biscuits from Dog Dish for Maggie. She was like putty in my hand. My dog that usually ran in the opposite direction when called was suddenly bounding toward me when I spoke her name.

I needed more biscuits. STAT.

I wasn't too happy with paying the price tag there so I decided to do some research. Happily, I found a super simple recipe to make them at home:

 All you need is whole wheat flour, milk, bacon, cold water, salt, and  garlic salt- because dogs deserve a well-seasoned biscuits.
 Fry up the bacon until it is super crispy (the crispier the better) and then crumble it into small pieces. Make sure to save that bacon fat- we will use it later!
Next, throw everything into your favorite mixing bowl and douse in bacon grease, then add water until the dough comes together.
Roll out the dough until it's about 1/4" thick and then you can cut it out into your favorite shape. I stuck with a traditional dog bone because I thought cat-shaped biscuits would be too cruel.  Now, to the oven!

Voila- a doggie-approved stash of bacon biscuits that can get even my wild mongrels to do this:

These biscuits are to be used with caution as they are irresistible to canine companions (and apparently, my mother thinks they smell pretty tasty, too). Now I have these two hairy things following me everywhere I go!


 Bacon Dog Biscuits
5 c whole wheat flour
1 c milk
1 lb bacon
1 tsp garlic salt
Pinch of salt
1/2 c cold water

1. Fry bacon and crumble. Reserve bacon grease.
2. Add flour, milk, garlic salt and bacon to bowl and mix.
3. Stir in bacon grease.
4. Add cold water until dough is moist. Add more water if needed.
5. Roll dough out 1/4" thick and cut out shapes.
6. Bake on a cookie sheet 35-40 min @ 350 degrees

This recipe is very forgiving. You don't need to worry about overworking the dough because hey- it's for a dog! I didn't even need to flour my work station to roll it out.