4.18.2012

Kale and Mascarpone Ravioli: Fresh and Tasty

Have you ever had kale? I hadn't till a week ago when I tried some curried kale at the supermarket buffet. I then proceeded to the produce section and picked myself up a bunch! I loved that its leafy texture held up through cooking and the slight bitter taste it had. And its super good for you!

I decided that kale would be the perfect thing with which to stuff the fresh ravioli dough I had just made- a lot more interesting than a plain ol' cheese filling! The result is a pasta dish that is at the same time luscious and packed with vitamines and antioxidants. Makes you feel a little less guilty!

To start, you need some freshly made ravioli dough- you can find my post on making your own here. If you don't have a pasta machine or don't want to take the time, you can use wonton wrappers and follow the same steps.

Begin by roughly chopping the kale- it's all going to get blended up later, so don't get too picky. I decided to take the stems out for this recipe so that the filling didn't seem too tough. Then, I sauteed up some garlic, shallot and red pepper flakes to give it a little kick. Do you cook with shallots often? I absolutely love them! You have a peppery, onion flavor without it being overwhelming.
After the ingredients have softened, throw the kale into the pan. That big pile of greens will quickly shrink before your eyes until you're left with this:

Once the mixture has cooled, toss it into the food processor and give it a spin until it looks smooth.
Time to mix in the rest of the filling ingredients- mascarpone cheese, lemon zest, and some parmesan cheese. I decided on mascarpone because it has a more interesting flavor than ricotta and would hold up to the kale. It has a beautiful, almost floral flavor and a silky texture- delicious!

Now for the fun part- time to stuff the ravioli! If you've made your pasta dough, you should have two long sheets of thinly-rolled pasta. Take each one of the sheets and cut it into two equal length pieces. Make sure you flour your surface for this, even if the dough is easily worked- it's going to get a little messy later.
Place tablespoons of the filling in two evenly-spaced rows the entire length of the pasta, making sure to leave room around all sides of the filling to seal the ravioli.
To get that great seal around the edges, all it takes is an egg wash. Brush all of the exposed dough with the wash and then place the second sheet on top, lining up the edges.
You want to make sure there is no air in these babies, so start on one end sealing each individually. It helps to work your way in a circle around the filling to force the air in one direction. I never thought the filling would fit inside the dough but the it is surprisingly pliable and mendable. If you do get a tear, take a spare piece of dough and paste it over the booboo with the egg wash. I did it with one of mine and it even survived the boiling water.


Now you can take your pasta cutter, specialized ravioli cutter, knife, or a glass with a good edge and cut out your pasta. The flour on your surface should help you remove them from the counter. Toss each of the ravioli into some cornmeal to keep them from sticking and let them dry out slightly before cooking. By the time you've finished stuffing the second sheet, they should be ready to go!
Cook the ravioli in batches so you don't crowd the pot. 4 minutes and they should be done- they will float to the top. When they're done cooking, place them into a saute pan with melted butter. Don't worry about draining them completely, the pasta water will just help the sauce. When all your ravioli has made it to the pan, squeeze in the lemon juice and sprinkle on the fresh thyme and parmesan cheese. Then, ever so gently, toss the pasta to coat and dig in!
The lemon and the thyme, with its own lemony quality, really brighten up the flavor of the kale in this dish and the kale gives the filling an interesting texture. After all of our hard work putting this together, there was not a scrap left by bedtime! Now I'm getting excited to try all of those recipes I ignored before I had a pasta maker!

Kale and Mascarpone Ravioli

  • 1 recipe ravioli dough
  • 2 tbs olive oil
  • 1 bunch kale, chopped, stems removed
  • 2 cloves garlic, chopped
  • 1 large shallot, chopped
  • 1/2 tsp red pepper flakes, or less if you don't like spice
  • 8 oz mascarpone cheese
  • Zest and juice of 1 lemon
  • 1/2 c shredded parmesan cheese, plus 1/4 c for garnish
  • 1 egg, beaten with 1 tbs water for egg wash
  • Cornmeal for dusting ravioli
  • 1 tbs fresh thyme, chopped
  • 1 1/2 tbs butter
  1. Heat 2 tbs olive oil over medium heat in saute pan. Saute garlic, shallot and red pepper until soft, about 3-4 minutes.
  2. Add kale and saute until softened and reduced in size, about 5-7 minutes. Remove from heat.
  3. When the mixture has cooled, puree in food processor until smooth.
  4. In a bowl, mix the kale mixture with both cheeses and lemon zest until well combined. Season with salt and pepper. 
  5. Cut each ravioli strip into two even length pieces. Place tablespoons of filling in two rows down length of one strip of pasta. Brush exposed dough with egg wash. Place second strip of pasta over filling and seal, taking care to expel all air.
  6. Cut out ravioli with pasta cutter or other instrument and toss each in cornmeal to prevent sticking. Let dry slightly.
  7. Cook ravioli in batches in boiling, salted water for 4 minutes. Pasta should float when it's done. Meanwhile, melt butter in saute pan over low-med heat.
  8. When pasta is cooked, place in pan and coat with butter. After all the pasta is in the pan, add the lemon juice, 1/4 cup parmesan cheese and the thyme and gently toss to coat. Serve immediately. 


Link Up
Ms. enPlace
It's SoVery Cheri
Everyday Mom's Meals
Addicted to Recipes
The Not So Functional Housewife
Simply Sweet Home- Friday Favorites
The Grant Life- Financial Friday
Simple Living with Diane Balch- Foodie Friday
The Country Cook- Weekend Potluck
A Little Nosh- Tastetastic Thursday
Miz Helen's Country Cottage- Full Plate Thursday
The Crafty Blog Stalker- Blog Stalking Thursday
Momnivore's Dilemma- Creative Juice Thursdays
The Shady Porch- Rock 'N Share

4.17.2012

Antietam National Battlefield: Hiking and History

Moving to Maryland, we were stepping right in the middle of American history. Getting onto the highway by our house there are signs to Gettysburg and Washington D.C.- it's everywhere here. Last weekend, we decided to take advantage of our location and hike the bloodiest battlefield of the Civil War- Antietam National Battlefield. 23,000 soldiers died in one day there in 1862. One day! Of course I didn't know about any of this before I Googled hiking trails... history has never been my strongest suit.
We took advantage of the free film and museum before we set out to give ourselves a brief overview of the events that took place. Then we were off with our lunch and water bottles in tow, ready for the long trek! Even if you're not a history buff, this place has gorgeous views all over.
The park has a driving tour that will take you all around the grounds, but if you're looking for exercise and nature you can get out and take a hike. There are many hiking trails on the grounds that are less than two miles, but we decided to do all of them- we were expecting eight miles! Here is a list of all the trails and a map of the grounds.
All around the grounds are monuments to the fallen soldiers as well as placards explaining a part of the battle. But I didn't seem to need any reading material, I had D to narrate what he thought the soldiers might have said...
And for some reason he loved the "war fencing" as he called it. Wants to put one in our next backyard.
As we were walking, we tried to imagine what be like to see rows of thousands of men with rifles marching towards you.  And 23,000 dead in one day? It's unfathomable in this day and age. I was baffled alone by how you would feed that many people. I guess we could have asked these guys:
No battlefield is complete without it's share of appropriately costumed fans. And did you notice the kid has a Batman costume on? Wrong era there, kiddo.
On the south side of the park, the hiking trails became more wooded as you walk along the river. There were some uphill climbs but for the most part it was easy terrain. We saw some canoes pass by while we were skipping rocks on the river (more like I was trying to skip rocks)- something else to check out!
I was just dying to see some animals all day long. I love seeing animals in the wild (and this includes a bunny in the backyard), I get so excited! All in all I saw 3 deer, a mockingbird, and 4 honey badgers. I mean, groundhogs. Score!
One of the most picturesque spots on the battlefield is the Burnside Bridge. It looks frozen in time. Unfortunately, it happens to be the home of a swarm of bees, so we ran across it. 
By the time we reached this tower, we were at mile 9 of our hike. There was no way I was going to climb those stairs- but it was pretty!
All in all it was a perfect day. The weather couldn't have been better- warm but with a cool breeze. We got great exercise with a 10 mile hike. Yes, TEN miles! If only those dang gnats hadn't been EVERYWHERE! We had to have swallowed/inhaled a hundred of those babies!
This definitely wont be the last time we go hiking- the next place we found has a waterfall! And if you're looking for exercise that isn't boring, get your boots on! We had a blast!


Link Up
Not Just a Housewife- Show Me What Ya Got

4.16.2012

Garden a Growin'

I got really excited about starting a garden this year. Before I had moved to the new house in Maryland in March, I had gardening books shipped to the house awaiting my arrival. As a house warming gift, my mom gave me a gift certificate to Home Depot, some cute new gloves and a couple of gardening magazines because I had been talking about it so much. I couldn't wait to get my hands in the dirt- the day after I got to Maryland, we went to the store and I raided the seed packet display and potted herbs.

I went a little bit overboard on the seeds. Once I started looking at them, I couldn't help but grab for most of them. I mean, they were only a buck- why not?! And if I didn't plant them this year, there was always next. So, here's what I ended up with:

  1. Tarragon
  2. Zucchini
  3. Broccoli Raab
  4. Watermelon Radish
  5. Okra
  6. Lavender
  7. Fennel
  8. Habanero Peppers
  9. Cherry Peppers
  10. Eggplant
  11. Garden Beans
  12. Kaleidoscope Carrots
  13. Roma Tomatoes
  14. Jalepeno Peppers 
  15. Cabbage
  16. Arugula
  17. French Breakfast Radish
  18. Carrot
  19. Scallion
  20. Cucumber
  21. Watermelon
  22. Big Boy Tomato
  23. Sweet Red Pepper
  24. Dill
Yes, I know. A bit much for someone's first garden. 

So to start out, I had to figure out which of the seeds I could start indoors (I had already done some research about when to start seeds and when to transplants). For that, I consulted The Vegetable Gardener's Bible. In self-watering seed-starting pallets, I started the zucchini, lavender, habaneros, cherry peppers, eggplant, roma tomatoes, jalepenos, cucumbers, watermelon, big boy tomatoes, and sweet red peppers. 
I didn't get fancy with the labeling- a strip of duct tape labeled with numbers let me know what seed was in each row. 
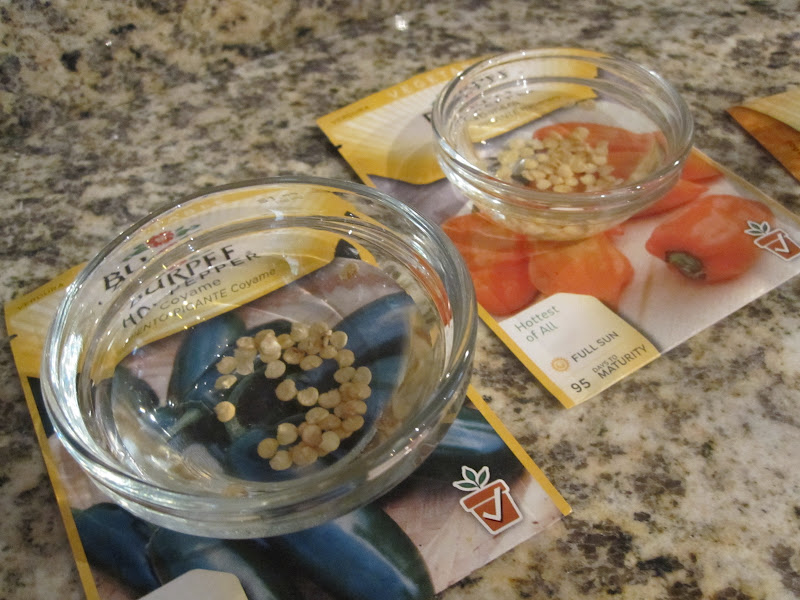
For the seeds that have a long time to harvest, I used some tricks I picked up in Starting from Seed from Fine Gardening which you can find here. For the larger seeds, I took a fingernail clipper and made a slight nick in their coating that helps moisture penetrate and get the seed germinating. I didn't even think about trying it with the little seeds, but they have a trick for those, too.  I also soaked the seeds overnight (just not longer than 24 hours) to jumpstart their sprouting. 
Within a few days, I had little sprouts popping up all over the place and they just kept growing!
Per the know-it-all book, I transplanted the tomatoes, eggplants and peppers to larger pots as soon as their true leaves (the second set) appeared. 
Now that the threat of frost has finally passed, I'm looking forward to getting some of these babies in the ground! I'm going to have all of the tomatoes, peppers and the eggplant in pots on the deck and then everything else will go into our plot at the community garden. Well, not everything else! We'll see what fits. 

What's going in your garden this year? 

Link Up

Not Just a Housewife- Show Me What Ya Got

Cozy Home Scenes- Your Cozy Home Party 

4.15.2012

How to Make a Photo Gallery Collage

Today marks the two year anniversary of my first date with D. Hard to believe it's only been two years! In  my mind, I put him into stories that happened before we met- it just feels like he was always there! If you're wondering where we met, it was on Match.com, believe it or not. Maybe someday we'll get on a commercial- in the mean time you can read our engagement story here.
Look at that good looking couple...

Oh, you thought this post was about how to make a photo gallery collage? Well, you are indeed in the right place.

We've got a lot more house than we have furniture or decor so we are constantly tossing around ideas of where our hypothetical furniture should go. As you can see, our basement living area is pretty large and is only half-filled by our stuff. And yes, the carpet is pink.
D says hello!
This is technically the "Man Cave" area of the house and D had talked about wanting to put up a collage of the two of us using memorabilia and photos. What a perfect idea for his anniversary gift! I know it will make him so happy to come home and see it complete.

To start, I gathered anything I could find that would hang on the wall. Framed pictures and license plates, college flags and those lovely fraternity paddles. I made sure that each item was not only meaningful but also that each of us was represented.

I started with hanging D's big Mizzou flag to define the remaning space I had to work with. I think he'd be thrilled if that was the only thing I put up. He loves his Mizzou. You should have seen him when the basketball team lost their first round in the NCAA tournament. Not a pretty sight.
Next, I laid out all of the items on the floor and arranged them until they looked just right. I prefer to have everything lined up on the edge so that it all fits inside a big rectangle but you can always have it look more free-flowing if you prefer.
The next step was to tape off the gallery area I was going to use with painter's tape. This helps get everything leveled on the edges and also keeps everything at the appropriate height.
I started with the top line and made sure that it was level before I proceeded.
Then I added the sides and lastly the bottom, using the level on each.
Now to step back and make sure it looks just how I want it! I ended up lowering the top line once I took a look at things. As long as you stay within this box, nothing is going to be placed too low or too high.

To begin, I started with the upper corner using my fool-proof method for hanging pictures. There will be no stray pencil marks or holes if you try my trick! All you need is painter's tape. Take a piece long enough to reach from the picture hanger to about an inch over the top of the picture. Position the tape where the center of the straight end hangs where the nail will be.
Next, hold the tape in place carefully and place the picture level with the top tape line, pressing the tape onto the wall. Smooth the lower half of the tape down and hammer in your nail in the center of the end of the tape and finally, remove the tape. (Note: if you're using picture hangers instead of a plain nail, you will have to account for the length of the nail to the hook)
I have never been able to hang pictures level before this trick!
Look at that handsome college grad!
I continued placing pictures down the side to establish the height of the gallery...
Then I continued to fill in the space, tweaking things as the gallery evolved, using my level guides. This took no time at all! If you aren't wanting to take the time and resources to trace and cut out each item out of paper- this is the way to go to get great results! You can even use these tricks to hang a row of pictures on the wall to make sure they're level with each other.
And best of all, D loved it!

Link Up

The Shady Porch- Rock 'N Share

Not Just a Housewife- Show Me What Ya Got
Cozy Home Scenes- Your Cozy Home Party
Sumo's Sweet Stuff- Market Yourself Monday

Under the Table and Dreaming- Sunday Showcase
C.R.A.F.T.- Making Mondays Marvelous
Skip to my Lou- Made by you Mondays

4.13.2012

Get Kneading: Make Your Own Pasta

If you haven't seen my new baby yet, this is Little Red (Big Red being my Kitchen Aid Mixer), my early birthday present from D. It can make fettuccine, linguine and flat sheets for ravioli and other hand-cut pastas. 

I remember the first time I had freshly made pasta. My roommate in college didn't live far from campus and we had gone to her parent's house for dinner. We were in for a treat- this wasn't just a break from cafeteria fare, this was a from-scratch dinner prepared by a professionally trained cook- her mother. I was in awe as the missus pulled homemade baguettes from the oven. But what I remember most vividly is the taste of the freshly made pasta straight from the pot before a splash of sauce had touched it. It was unbelievably flavorful and had a pillowy, but firm, texture. How would I ever go back to the boxed dried stuff? Now years later, I don't have to!

I could hardly wait to put my new toy to work- luckily pasta dough contains the simplest ingredients so I didn't even need to go to the store. I decided to try Tyler Florence's pasta recipe because it only called for all-purpose flour in addition to eggs, salt and olive oil. Many other recipes use semolina or durum flours- I will have to compare them all in the future!

The easiest way to make pasta dough is with a stand mixer and your dough hook. If you don't have a mixer, you can always follow the directions in Tyler's recipe; your counter top will just be a little messier.
To start out, combine the flour and salt in the mixing bowl, start the mixer on low, and add the eggs one at a time, waiting until each one is incorporated to add the next. Once the flour began to be incorporated I turned the mixer up to medium speed- don't want a dust cloud! 

Continue mixing while you add in a tablespoon of oil until the dough forms a ball. In the middle of mixing, I turned off the mixer briefly to scrape the bottom of the bowl to make sure everything was combined. I also added just a smidge more oil because the dough seemed to lack moisture. 
Now it's time to put your muscles to work- get kneading! Lightly flour your surface and knead and fold the dough for about 10 minutes until it begins to feel elastic.
This is a good time to recruit some help in the kitchen- D showed the dough who was boss!
After the dough is worked, shape it into a ball, brush it with oil and wrap it in plastic wrap. It will need to sit for 30 minutes for the dough to relax.
Now the fun begins! After the dough is rested, cut the ball in half and shape it into a rectangle. Feed the rectangle through your pasta machine at the widest setting two to three times then decrease the roller width one notch and run the dough through another 2-3 times. Continue to reduce the width of the rollers- as the dough starts to thin out and lengthen, you might need to flour the dough to keep it from sticking to itself. 
When your pasta is as at the desired thickness, you can run it through one of the cutter attachments or cut it by hand to your liking. We decided on ravioli so we rolled the dough out until it was see-through- I was surprised how strong the pasta was even for being so thin! Here's a fantastic article on how to cut a ton of different pasta shapes- including those cute bow-ties. 

To cook your homemade pasta, it doesn't take long in a pot of boiling, salted water. Check out this chart for how long to cook each type- but remember taste will always tell you if it's done!

If you're not planning on cooking your pasta right away or you'd like to make a stock pile, let the pasta dry for an hour. Then, package it in freezer bags, label with the date, and store in the refrigerator for up to 3 days or in the freezer for up to 3 months. You can also let it dry for 24 hours (if you can spare the counter space!) and then store it in the pantry.

I was expecting my first pasta making experience to not go so well but it was surprisingly easy! Nothing cracked or tore. It wasn't even that messy! I can't wait to try out different recipes and cuts. 

Here are some recipes I found for different kinds of pasta dough:


Pasta Dough- Tyler Florence
  • 2 C all-purpose flour
  • 1 tsp salt
  • 3 large eggs
  • 2 tbs extra-virgin olive oil, divided
  1. Combine the flour and salt in a mixer fitted with the dough hook. Add eggs, one at a time, after each is combined. Continue to mix and drizzle in 1 tbs oil, until it forms a ball.
  2. Flour the surface and knead and fold the dough for 10 minutes until it becomes elastic and smooth.
  3. Form the dough into a ball, brush with remaining oil and cover with plastic wrap. Let rest for 30 minutes.
  4. Cut the dough in half, shape into a rectangle and feed through the pasta machine on the widest setting 2-3 times, dusting with flour as necessary. Decrease the roll width and run the dough through an additional 2-3 times. Continue to decrease roller size until desired thickness is obtained. Cut pasta as you would like.
Link Up
Creation Corner
Happy Go Lucky
The Not So Functional Housewife
Simple Living with Diane Balch- Foodie Friday
The Country Cook- Weekend Potluck
A Little Nosh- Tastetastic Thursday
Miz Helen's Country Cottage- Full Plate Thursday
The Shady Porch- Rock 'N Share
Centsational Girl- Favorite Kitchen Gadgets
All the Small Stuff- Tuesdays at the Table
Not Just a Housewife- Show Me What Ya Got
Cozy Home Scenes- Your Cozy Home Party
Addicted to Recipes